Android Layout Design: A Complete Guide to Layout Types
In Android development, designing the user interface (UI) is a crucial aspect of creating intuitive and visually appealing apps. Android provides several types of layout containers to organize UI components on the screen. These layout managers determine how UI elements like buttons, text fields, and images are arranged. Understanding the different layout options is essential for building responsive and flexible designs.
In this article, we will cover the most commonly used layouts in Android, including LinearLayout, RelativeLayout, ScrollView, ConstraintLayout, FrameLayout, and others. Each layout has its own specific behavior and is suited for different design needs.
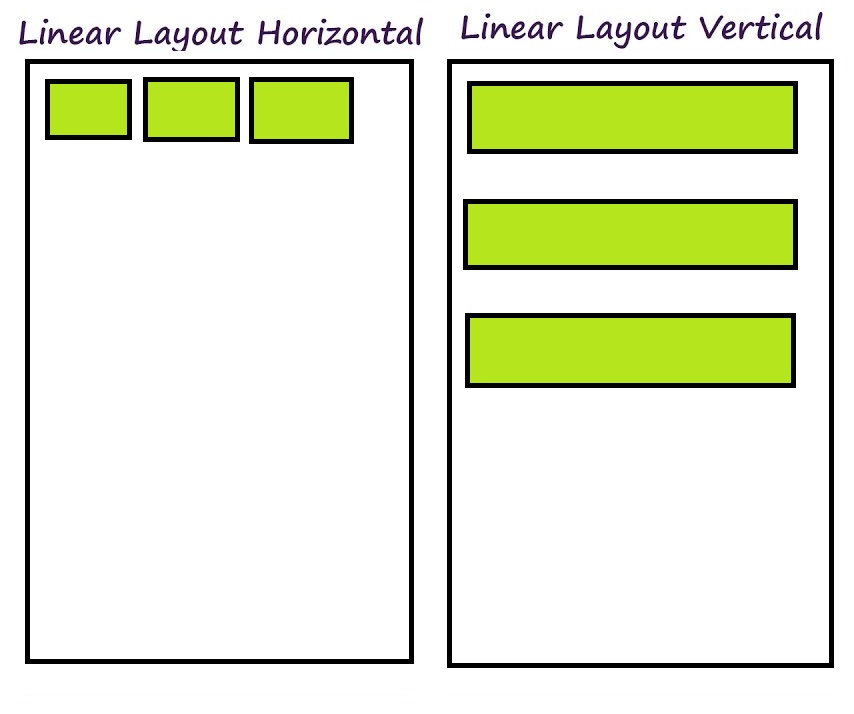
LinearLayout
A LinearLayout arranges its child views in a single direction, either vertically or horizontally. This layout is ideal when you want UI components to be stacked in a straight line.
Key Properties:
- Orientation: You can set the orientation to
vertical(default) orhorizontalusing theandroid:orientationattribute. - Weight: Child views can be assigned a weight using
android:layout_weight, which specifies how much space a view should take up relative to other views in the layout.
Example of a Vertical LinearLayout:
<LinearLayout
    android:layout_width="match_parent"
    android:layout_height="wrap_content"
    android:orientation="vertical">

    <TextView
        android:layout_width="wrap_content"
        android:layout_height="wrap_content"
        android:text="First Item" />

    <TextView
        android:layout_width="wrap_content"
        android:layout_height="wrap_content"
        android:text="Second Item" />

    <Button
        android:layout_width="wrap_content"
        android:layout_height="wrap_content"
        android:text="Submit" />
</LinearLayout>
Example of a Horizontal LinearLayout:
<LinearLayout
    android:layout_width="match_parent"
    android:layout_height="wrap_content"
    android:orientation="horizontal">

    <Button
        android:layout_width="wrap_content"
        android:layout_height="wrap_content"
        android:text="Button 1" />

    <Button
        android:layout_width="wrap_content"
        android:layout_height="wrap_content"
        android:text="Button 2" />
</LinearLayout>
When to Use LinearLayout:
- You need a simple layout where elements are arranged in a single row or column.
- You want to divide available space among child views using weights.
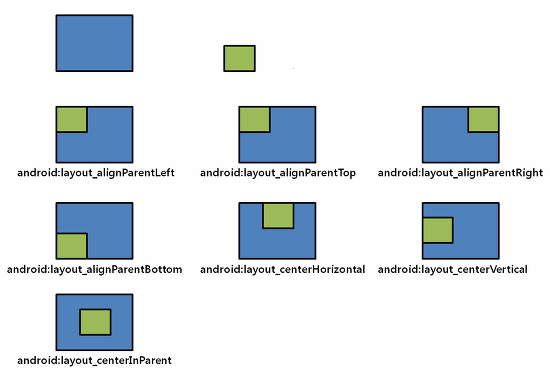
RelativeLayout
RelativeLayout is a more flexible layout that allows child views to be positioned relative to each other or relative to the parent container. You can position views based on relationships like “to the left of”, “below”, “above”, or “aligned to”.
Key Properties:
- android: Positions a view below another view.
- android: Positions a view to the right of another view.
- android: Aligns a view to the top of the parent container.
- android: Centers a view within the parent.
Example of a RelativeLayout:
<RelativeLayout
    android:layout_width="match_parent"
    android:layout_height="match_parent">

    <TextView
        android:id="@+id/label"
        android:layout_width="wrap_content"
        android:layout_height="wrap_content"
        android:text="Label"
        android:layout_alignParentTop="true"
        android:layout_centerHorizontal="true" />

    <Button
        android:layout_width="wrap_content"
        android:layout_height="wrap_content"
        android:text="Click Me"
        android:layout_below="@id/label"
        android:layout_centerHorizontal="true" />
</RelativeLayout>
When to Use RelativeLayout:
- You need to create complex layouts where views are positioned relative to each other or the parent.
- You want to avoid nested layouts to improve performance.
ScrollView
A ScrollView is a layout container that allows vertical scrolling of its child views. It’s typically used when the content of the UI exceeds the available screen space. ScrollView can only contain one direct child, but that child can be a layout that contains multiple views.
Key Properties:
- android: If set to
true, the ScrollView will expand its child view to fill the available space. - Vertical Scrolling: ScrollView supports vertical scrolling only. For horizontal scrolling, use
HorizontalScrollView.
Example of a ScrollView:
<ScrollView
    android:layout_width="match_parent"
    android:layout_height="match_parent">

    <LinearLayout
        android:layout_width="match_parent"
        android:layout_height="wrap_content"
        android:orientation="vertical">

        <TextView
            android:layout_width="wrap_content"
            android:layout_height="wrap_content"
            android:text="This is a long text that requires scrolling..." />

        <!-- Add more views here -->

    </LinearLayout>
</ScrollView>
When to Use ScrollView:
- You have content that is larger than the screen and needs to be scrollable.
- You want to enable vertical scrolling for a set of UI components.
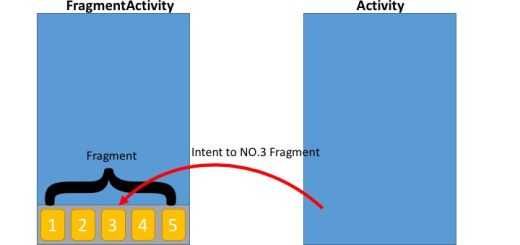
FrameLayout
FrameLayout is a simple layout that stacks its child views on top of each other. It is typically used when you need to display a single view, but multiple views can also be layered on top of each other, with each view overlapping the previous one.
Key Features:
- Layering: Views added to a FrameLayout are positioned on top of each other.
- Single Child: FrameLayout is often used when you need to show just one view (e.g., to display an image or a fragment).
Example of a FrameLayout:
<FrameLayout
    android:layout_width="match_parent"
    android:layout_height="match_parent">

    <ImageView
        android:layout_width="match_parent"
        android:layout_height="match_parent"
        android:src="@drawable/background_image" />

    <TextView
        android:layout_width="wrap_content"
        android:layout_height="wrap_content"
        android:text="Overlay Text"
        android:layout_gravity="center" />
</FrameLayout>
When to Use FrameLayout:
- You need a simple layout for displaying a single view or layering views on top of one another.
- You want to use fragments to dynamically change content.
ConstraintLayout
ConstraintLayout is a powerful and flexible layout that allows you to create complex and responsive layouts while maintaining good performance. It lets you define relationships between child views to control their position and size. This layout is similar to RelativeLayout but more efficient and versatile.
Key Features:
- Constraint: You define constraints for each view to determine how they relate to other views or the parent.
- Chain: Views can be linked together to form a chain, allowing them to share available space.
- Bias: You can control the positioning of a view between two constraints using a bias value.
Example of a ConstraintLayout:
<androidx.constraintlayout.widget.ConstraintLayout
    android:layout_width="match_parent"
    android:layout_height="match_parent">

    <TextView
        android:id="@+id/title"
        android:layout_width="wrap_content"
        android:layout_height="wrap_content"
        android:text="Title"
        app:layout_constraintTop_toTopOf="parent"
        app:layout_constraintStart_toStartOf="parent"
        app:layout_constraintEnd_toEndOf="parent" />

    <Button
        android:id="@+id/button"
        android:layout_width="wrap_content"
        android:layout_height="wrap_content"
        android:text="Click"
        app:layout_constraintTop_toBottomOf="@id/title"
        app:layout_constraintStart_toStartOf="parent"
        app:layout_constraintEnd_toEndOf="parent" />
</androidx.constraintlayout.widget.ConstraintLayout>
When to Use ConstraintLayout:
- You want to create complex, responsive layouts with fewer nested views.
- You want more control over positioning, alignment, and proportional sizing of views.
Conclusion
In Android, the choice of layout can have a significant impact on both the performance and flexibility of your app’s UI. LinearLayout and RelativeLayout are great for simple layouts, while ConstraintLayout offers more versatility and efficiency for complex designs. ScrollView is useful when your content exceeds the screen size, and FrameLayout works well for overlaying views.
Understanding the different types of layouts will help you design better user interfaces, ensuring that your app is both visually appealing and functionally responsive.